UPDATED 09/07/14
This is the third post in my series for building a fully distributed vCloud Automation Center deployment. In this post, we’ll configure vCenter Orchestrator (vCO) for High Availability using two nodes and an vCloud Networking and Security Edge Gateway as a Load Balancer. I’ll use the vCenter Orchestrator Appliance v5.5.1.0.1617225. I want to ensure that both vCO nodes return the same, organizationally-trusted SSL certificate, so we’ll configure that too.
Prerequisites
- Database Server (ideally , it should be configured for high availability – I’ll be using a Microsoft SQL Server 2012 Failover Cluster)
- Database for vCO
- Credentials for database
- Reserve IP addresses for two nodes and virtual IP
- DNS records for both nodes and virtual IP (I’m using vcvco1 and vcvco2 for the appliance nodes and vcvco as the virtual)
- Appropriate Identity Sources added to SSO
- A vCO administrators security group with appropriate members
- An Active Directory integrated Certificate Authority
Notes
In the steps below, text in red is not meant to be typed verbatim. You’ll replace the value with something relevant to your environment.
Configure database settings (MSSQL)
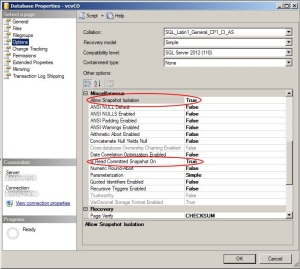
To ensure that multiple Orchestrator nodes can use the database without clashing, you’ll need to enable a couple of optional settings.
Thiscan be done through script:ALTER DATABASE [vcvCO] SET ALLOW_SNAPSHOT_ISOLATION ON; |
Or through theSSMS GUI: |
Deploy and configure the First Orchestrator Appliance
- Using the vSphere or vSphere Web Client, deploy the appliance from OVF to an available HA cluster. I named mine vcvco1.
- Adjust the resources if necessary and power on vcvco1.
- Browse to https://vcvco1:5480, logon as root
- Set the timezone, confirm the network settings and hostname. I set the hostname to the vcvco, the cluster name. Log out of the VAMI.
- Browse to https://vcvco1:8283, logon as vmware
- Navigate to the Network section
- (Optional) on the Network tab, set the IP address to the actual address. Leave the port numbers at default
- On the SSL Trust Manager tab, type the URL to your SSO server (eg: https://vcsso.domain.local:7444) and click the Import button. Verify that the certificate information is correct and click Import to add it to the trust. Repeat this for your vCenter Server(s).
- In the Authentication Section, you can choose LDAP or SSO. I’m going to configure it for SSO. Enter your sso hostname (eg: vcsso.domain.local). Click the Advanced Settings Link to see and verify that the Token service and Admin service URLs are fully populated with the correct port number (7444). Enter the user name and password for anSSO administrator (eg: administrator@vsphere.local) in the appropriate boxes. Click the RegisterOrchestrator button. Wait for it….

Registered with SSO, but not configured - After the registration is confirmed, select the correct group in the vCO Admin – domain and group dropdown list. Then, click the Accept Orchestrator Configuration button.
- In the Database section; again I’m using SQL Server, but you’d select what’s appropriate for your environment.
- After the connection is made, click the link to Create the database tables, then Apply Changes.
- On the Licenses section, enter the host name of the vCenter Server and credentials, then click Apply Changes.
- Install any plugins you need (vCAC, ViPR, Powershell, etc) and restart the service to complete the plugin installation.
Create Package Signing Certificate
- On the Server Certificate section, click the “Create a certificate database and self-signed server certificate” link. Enter vcvco.domain.local – that’s the load-balanced name, not the actual hostname – for the Common Name, set the organization, ou and country, then click Create.
- Still in the Server Certificate section, click “Export a certificate signing request”. Save the vCO_SigningRequest.csr file to your system.
- Log into the Microsoft CA certificate authority Web interface. By default, it is http://servername/CertSrv/.
- Click the Request a certificate link.Click advanced certificate request.
- Click the Submit a certificate request by using a base-64-encoded CMC or PKCS #10 file, or submit a renewal request by using a base-64-encoded PKCS #7 file link.
- Open the certificate request (vCO_SigningRequest.csr) in notepad. Copy the content between —–BEGIN CERTIFICATE REQUEST—– and —–END CERTIFICATE REQUEST—–
- Paste the copied content into the “Base-64-encoded certificate request” textarea. Select Web Server as the Certificate Template.
- Click Submit to submit the request.
- Click Base 64 encoded on the Certificate issued screen. Click the Download Certificate Chain link.
- Save the package as C:\certs\certnew.p7b.
- Double-click thep7b to open it incertmgr. Navigate to Certificates – Current User\C:\Certs\Certnew.p7b\Certificates.

Certs in P7b - You’ll see two certificates here (unless you have intermediate certificates, then you’ll have more).
- Right-click the one for the vCO server, choose All Tasks|Export. Save the file as Base-64 encoded X.509 (.CER) as vco.crt
- Right-click the one for root CA server, choose All Tasks|Export. Save the file as Base-64 encoded X.509 (.CER) to as root.cer . Close certmgr.
- Before vCO will accept the CA-signed certificate, we have to import the root certificate. Launch the Orchestrator Client. You can use https://vcvco1.domain.local:8281/vco/client/client.jnlp
- Login to thevCO client as a member of thevCO Admins group

Login to vCO Client - In the client, launch Certificate Manager from Tools|Certificate Manager.
- Under Known Certificates, click the “Import Certificate” button. Browse to and select root.cer that you saved earlier. Verify that the certificate details are correct and client the “Import Certificate” button to finish. Close or minimize the vCO Client.
- Back on the Server Certificate section of the vCO configuration, click “Import a certificate signing request signed by a certificate authority”. Select the vco.crt file you saved and click import. If you get an error here, make sure you’ve imported the correct root (and any intermediate) cert into vCO.
Replace vCO Client certificate
Now, if you navigate to https://vcvco1.domain.local:8281/vco, you’ll see that the certificate is still untrusted. Let’s fix that. The certificate and key is stored with a specific alias and password, we’re going to replace them, but reuse the alias and password.
- SSH into vcvco1 as root
- Navigate to /etc/vco/app-server/security and make a copy of the jssecacerts keystore file
cd /etc/vco/app-server/security
 cp ./jssecacerts ./jssecacerts.backup
- Use keytool to delete the item with the “dunes” alias. The keystore password is “dunesdunes”
keytool -keystore ./jssecacerts -delete -alias dunes -storepass dunesdunes - Use keytool to create a CSR. The certreq alias must be “dunes”. Exporting the csr to the fie named vcvvcoreq.csr
keytool -keystore ./jssecacerts -storepass dunesdunes -certreq -alias dunes -file vcvcoreq.csr - Use filezilla or SFTP again to retrieve the csr
- Just like we did for the package signing certificate, submit a new request to your CA.
- This time, just download the certificate (not the certificate chain) in DER format instead of base64. save the file as vcoDER.cer.
- Use filezilla or SFTP to copy vcoDER.cer to /etc/vco/app-server/security on vcvco1. (you can actually place it anywhere, but this makes sense)
- Using keytool again, import the CA-signed cert into the keystore. The passwords are kept ‘dunesdunes”.
keytool -keystore ./jssecacerts -storepass dunesdunes -importcert -alias dunes -keypass dunesdunes -file ./vcoDER.cer - Restart the vCO services
service vco-server restart
Prepare Second Orchestrator Appliance
- Shutdown the first vCO appliance (vcvco1) to be safe
- Clone vcvco1 to a new VM named vcvco2, be sure to update the hostname and IP address in the vApp Properties. (Although it doesn’t affect the guest OS in this case)
- The cloned VM will retain the original IP address and hostname, so browse to https://vcvco1:5480, logon as root and set the correct IP address and hostname.
- Once vcvco2 is on the correct IP address, you can power on vcvco1
- Browse to https://vcvco2:8283, logon as vmware.
- On the Network area, select the correct IP address and apply changes.
Configure the cluster

- Browse to the vCO Configuration web interface, http://vcvco1:8283. Logon as vmware.
- Under Server Availability, select Cluster mode
- Set the number of active nodes to 2, leave the heartbeat values at default unless you have a reason to change them. Click “Apply Changes”. Note that there will be times when you’ll have to set the number of active nodes to 1.
- Under Startup Options, restart service. This may not be necessary, but in my case, the nodes were not listed until after I restarted the vCO service.
- Repeat steps 1-4 on vcvco2
Preparing to load-balance
Note – this worked for me, YMMV
- Using vCNS Manager, locate the appropriate edge gateway, click Actions|Manage to open it for editing
- On the Configure Tab, edit the interface that will listen on the virtual IP
- Edit the Subnet and add the Virtual IP. It’s probably not the primary IP. Save and publish those changes.

Add the virtual IP to the Edge Gateay - On the Load Balancer tab, on the Pools page, click “Enable”, then “Publish Changes”
- Click the green plus to add a load-balancing pool
- Enter a recognizable Name and Description, click “Next”.

Load Balancer Pool - On the Services step, check HTTPS, set Balancing Method to “ROUND_ROBIN” and the Port to 8281.Clck “Next”.

Services (HTTPS:8281) - On the Health Check step, set it as shown. Click “Next” when done.

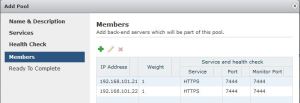
Health Check - On the members step, click the green plus to add the IP address of yourvCO servers to the pool. I suggest keeping the weight for each at 1, while both nodes are active. There are times when you’ll want to make one node active though (details below). Keep the HTTPS port and Monitor Port at 8281 for each. Click “Next” once all you membersare added.

vCO Members - Review the Ready to complete step and click “Finish” if it all correct
- Click the Publish Changes Button before proceeding
- Click the “Virtual Servers” link, then the green plus to add a Virtual Server

vCO Virtual Server - Enter a meaningful name and description, provide the Virtual IP adddress that you added to the edge earlier, select the Pool created in the steps above and Enable HTTPS on port 8281. Set the Persistence Method to SSL_SESSION_ID and make the “Enabled” box is checked. Click “Add” then “Publish Changes”
- Test by navigating to https://vcvco.domain.local:8281/vco and verifying that the certificate matches.
- IMPORTANT UPDATE! – Repeat steps 7-14 above for TCP 8286 and 8287. Without these undocumented ports, neither the vCO client nor the vCAC appliance will connect to the vCO cluster.
Additional steps
Put the two vCO nodes in a vApp, set them to start a few minutes apart to prevent both nodes from trying to initialize the database concurrently.

Notes, Caveats and Warnings
When writing information to vCO, such as designing and importing new workflows, VMware requires that only one vCO node be active. I suggest that before you connect vCAC to vCO, you take the following steps:
- Logon to vcvco1 configuration as vmware , set the number of active nodes under Server Availability to 1. Apply changes.
- Logon to vcvco2 configuration as vmware , set the number of active nodes under Server Availability to 1. Apply changes.
- Watch the Service Availability area, wait for it to indicate that one node is in standby. If you’re impatient as I am, you can restart the service on vcvco2. It should come up as standby. Record which node is RUNNING.
- Logon to vCNS Manager, locate the appropriate Edge Gateway for the vcvco virtual server.
- Edit the Load Balancer pool, leave the RUNNING node with a weight of 1, set all other nodes’ weight to zero
Once the workflows have been created and edited and you want to resume distribution of vCO jobs among the nodes, just reverse these changes, setting the active nodes to 2 and the weights to 1 for both nodes.
Do not connect the vCO client to the virtual address. In this case, only TCP8281 is forwarded and the vCO client needs additional ports forwarded to the nodes. Other load-balancers/NAT devices may not have this issue.
This post may get some edits as I work through the rest on the vCAC distributed build.
I still have no idea why the certificate alias and password is “dunes”. UPDATE – The company that was bought by VMware that originally developed the product that is now vCO was named “Dunes”.
References


