Automating PKS Upgrades

Last night, Pivotal announced new versions of PKS and Harbor, so I thought it’s time to simplify the upgrade process. Here is a concourse pipeline that essentially aggregates the upgrade-tile pipeline so that PKS and Harbor are upgraded in one go.

What it does:

  1. Runs on a schedule – you set the time and days it may run
  2. Downloads the latest version of PKS and Harbor from Pivnet- you set the major.minor version range
  3. Uploads the PKS and Harbor releases to your BOSH director
  4. Determines whether the new release is missing a stemcell, downloads it from PivNet and uploads it to BOSH director
  5. Stages the tiles/releases
  6. Applies changes

What you need:

  1. A working Concourse instance that is able to reach the Internet to pull down the binaries and repo
  2. The fly cli and credentials for your Concourse.
  3. A token from your PivNet account
  4. An instance of PKS 1.0.2 or 1.0.3 AND Harbor 1.4.x deployed on Ops Manager
  5. Credentials for your Ops Manager
  6. (optional) A token from your GitHub account

How to use the pipeline:

  1. Download params.yml and pipeline.yml from here.
  2. Edit the params.yml by replacing the values in double-parentheses with the actual value. Each line has a bit explaining what it’s expecting.  For example, ((ops_mgr_host)) becomes opsmgr.pcf1.domain.local
    • Remove the parens
    • If you have a GitHub Token, pop that value in, otherwise remove ((github_token))
    • The current pks_major_minor_version regex will get the latest 1.0.x.  If you want to pin it to a specific version, or when PKS 1.1.x is available, you can make those changes here.
    • The ops_mgr_usr and ops_mgr_pwd credentials are those you use to logon to Ops Manager itself.  Typically set when the Ops Manager OVA is deployed.
    • The schedule params should be adjusted to a convenient time to apply the upgrade.  Remember that in addition to the PKS Service being offline (it’s a singleton) during the upgrade, your Kubernetes clusters may be affected if you have the “Upgrade all Clusters” errand set to run in the PKS configuration, so schedule wisely!

  3. Open your cli and login to concourse with fly

    fly -t concourse login -c http://concourse.domain.local:8080 -u username -p password

  4. Set the new pipeline. Here, I’m naming the pipeline “PKS_Upgrade”. You’ll pass the pipeline.yml with the “-c” param and your edited params.yml with the “-l” param

    fly -t concourse sp -p PKS_Upgrade -c pipeline.yml -l params.yml

    Answer “y” to “Apply Configuration”…

  5. Unpause the pipeline so it can run when in the scheduled window

    fly -t concourse up -p PKS_Upgrade

  6. Login to the Concourse web to see our shiny new pipeline!

    If you don’t want to deal with the schedule and simply want it to upgrade on-demand, use the pipeline-nosched.yml instead of pipeline.yml, just be aware that when you unpause the pipeline, it’ll start doing its thing.  YMMV, but for me, it took about 8 minutes to complete the upgrade.

Behind the scenes
It’s not immediately obvious how the pipeline does what it does. When I first started out, I found it frustrating that there just isn’t much to the pipeline itself. To that end, I tried making pipelines that were entirely self-contained. This was good in that you can read the pipeline and see everything it’s doing; plus it can be made to run in an air-gapped environment. The downside is that there is no separation, one error in any task and you’ll have to edit the whole pipeline file.
As I learned a little more and poked around in what others were doing, it made sense to split the “tasks” out, keep them in a GitHub public repo and pull it down to run on-demand.

Pipelines generally have two main sections; resources and jobs.
Resources are objects that are used by jobs. In this case, the binary installation files, a zip of the GitHub repo and the schedule are resources.
Jobs are (essentially) made up of plans and plans have tasks.
Each task in most pipelines uses another source yml. This task.yml will indicate which image concourse should build a container from and what it should do on that container (typically, run a script). All of these task components are in the GitHub repo, so when the pipeline job runs, it clones the repo and runs the appropriate task script in a container built on an image pulled from dockerhub.

More info
I’ve got a several pipelines in the repo.   Some of them do what they’re supposed to. 🙂 Most of them are derived from others’ work, so many thanks to Pivotal Services and Sabha Parameswaran

Update vCloud Director 5.5.0 to 5.5.1.1

This is just a quick how-to for upgrading a single vCD 5.5.0 cell to 5.5.1.1. Version 5.5.1 fixes some pretty important bugs that can affect the stability of the environment. Version 5.5.1.1 is not vulnerable to the “Heartbleed” bug. It’s a fairly simple and quick update. This Post has been updated to reflect v5.5.1.1 because you should also update to 5.5.1.1.

Preparation

  • Download the installation file (vmware-vcloud-director-5.5.1-1753992.bin) from my.vmware.com
  • Have your credentials for the vCD cell(s) handy
  • Make sure the cell has more than 2.7GB of free space on /. I use “df -h” to see the available space.
  • Backup the database
  • Backup the database (No, really)
  • Take a snapshot of the cell(s) to be upgraded

Steps

  1. Logon via SSH
  2. Either using SCP to push the bin file to the cell or using wget on the cell to pull the bin file down, get it there. Put it in /tmp
  3. cd to /opt/vmware/vcloud-director/bin
  4. Run this to check the IsActive status of the cell (replace “administrator” with the appropriate username)

    ./cell-management-tool -u administrator cell -status

  5. Run this to quiesce the cell

    ./cell-management-tool -u administrator cell -quiesce true

  6. Run this to shut down the cell

    ./cell-management-tool -u administrator cell -shutdown

  7. Now, we’ve stopped the process and are ready to upgrade
  8. cd back to /tmp
  9. Make the bin file executable

    chmod u+x vmware-vcloud-director-5.5.1-1753992.bin

  10. Run the bin

    ./vmware-vcloud-director-5.5.1-1753992.bin

    Wait while the rpm extracts and checks the free space.

  11. If you’re ready, answer “Y” when asked Would you like to upgrade now?

    Would you like to Upgrade to 5.5.1.1?
    Would you like to Upgrade to 5.5.1.1?
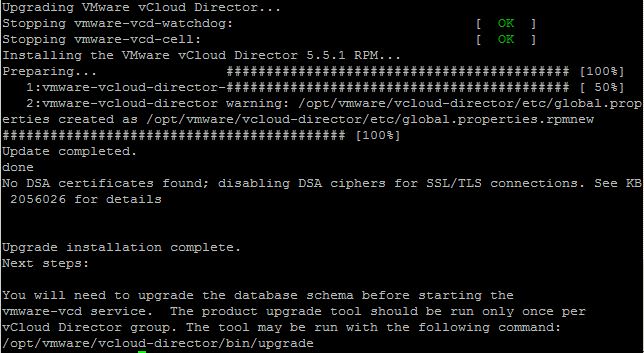
  12. The upgrade process should complete within a few seconds and then let you know that the database schema needs to be updated.
    Done, now update database schema
    Done, now update database schema
    Run this to start the schema upgrade:

    /opt/vmware/vcloud-director/bin/upgrade

  13. Answer “Y” to begin database schema upgrade
  14. If you are prompted that there are still active cells, make sure that there are no other cells running. The one we’re working on is stopped, but the is maintaining a connection to the database. It’s the only vCD cell using the database, so it’s okay to proceed. respond with “Y”
    Uh-oh!  Cells are still active
    Uh-oh! Cells are still active
  15. Allow the script to rebuild indexes and update statistics
    Update schema and rebuild indexes
    Update schema and rebuild indexes
  16. Allow the script to restart the cell

Multi-cell differences

  1. Perform steps 1-9 on each cell before proceeding
  2. On each cell, complete steps 10-11. Do not upgrade the database schema or start any vCD services until all the cells have been upgraded
  3. On each cell, after the upgrade completes, be sure the vCD services are stopped by running

    service vmware-vcd stop

  4. Perform steps 12-16 on your favorite (or the last) cell
  5. Start the vCD services on the other cells by running

    service vmware-vcd start

    on each.

References

Order of Operations when Upgrading vCloud Director to 5.1

This should be a short article. I’m assuming you have vCD 1.5 running on vSphere 5.0 with vShield Manager 5.0.

Starting with:

  • vCenter Orchestrator 5.0
  • vCenter Server 5.0
  • vShield Manager 5.0.x
  • ESXi 5.0
  • vCloud Director 1.5.x

We want to end up with everything on v5.1.x

  1. Update Orchestrator to 5.1 – it’s compatible with vCenter 5.0 and 5.1
  2. Update vShield Manager to 5.0.2.  This is important, this version works with both vCenter 5.0 & 5.1 as well as vCD 1.5 and 5.1. Then redeploy your vShield Edge appliances
  3. Update vCloud Director to 5.1.  Be sure to back up your database before upgrading in case you have to roll-back
  4. Update vCenter Server to 5.1.  Install your Single-Sign On Service at this step too.
  5. Update vShield Manager to vCenter Security & Networking 5.1.  Then redeploy your vShield Edge appliances.
  6. Update VMware Update Manager to 5.1
  7. Use VUM to upgrade ESXi to 5.1

Note: If you’ve deployed VMware View, you’ll want to upgrade it to v5.1.2 before upgrading vCenter.