In vRA 6.2, using vRO 6.0, you may find that the data collection and other vRO workflows fail with the error “You must have at least one properly configured vCenter Orchestrator endpoint that is reachable”. The IaaS/Monitoring/Log will show which DEM worker threw the error. When you check the DEM worker logs for that instance, if you find the message “Could not create SSL/TLS secure channel. —> System.Net.WebException: The request was aborted: Could not create SSL/TLS secure channel“, you have probably been affected by VMKB 2123455 and MS KB 3061588.
Although both articles seem to suggest that removing the offending patch will solve the problem, I think figuring out exactly which patch is rather awkward. The easier fix is to apply a quick registry hack to your DEM workers (and wherever the vRA Designer runs).
Logon as an account with admin rights (suggest the account your IaaS services run under)
Add/update the DWORD value ClientMinKeyBitLength and set the value to 512 decimal (200 hex)
Restart the DEM worker service
Notes:
The Microsoft patch sets the default minimum group size to 1024. It appears that the vRO 6.0.x appliances use something less than that. This registry hack indicates that SCHANNEL should accept keys as small as 512 bits. I suggest only applying this to the necessary and affected machines since it does lower the bar for the DHE security requirements.
Thanks to Zach Milleson for reminding me that this workaround may not resolve everyone’s issue, depending on which MS patches are installed. If this workaround doesn’t work for you, you may have to locate and remove the offending patch. YMMV.
***UPDATE*** The download link is currently broken. I seem to have lost the file, will fix the link as soon as I find or recreate it. Sorry about that. 😦
In part 1 of this series, we created a list of security groups and displayed that list to users during the request. In this post, we want to enhance that functionality by adding these features.
Creation of Security Groups and inclusion in Dropdown lists
Add a VM to a Security Group post-provisioning
Import existing Security Groups into vRA inventory
Add a Security Group to a Dropdown list
We’re going to do that by importing a vCO package with some new workflows and actions, then link up the workflows to Advanced Services and Resource Actions. As before, we’ll require the NSX and vCAC/vRA plugins for Orchestrator.
Preparation
Complete the creation of the VCNS.SecurityGroup.Names.production property dictionary and valuelist attribute from Part 1. We’re going to reuse those items. so make a note of the exact name of the property dictionary and the valuelist attribute. In my case, I’ve named the Property Dictionary VCNS.SecurityGroup.Names.production and also named the valuelist attribute for it VCNS.SecurityGroup.Names.production
Make sure vRA Advanced Services Server Configuration is complete and test the connection to the Orchestrator server. The default, built-in VCO is fine.
Login to vCO client as a vCO Admin. Set the mode to “Design” and navigate to the Inventory tab. Make sure that you have a connection listed under “vCAC Infrastructure Administration” and a connection listed under “NSX”.
Confirm that you have the necessary connections on the inventory tab
Get the Package
I’ve put together a handful of workflows and actions that use or expand the NSX plugin to provide information of functionallity back to vRA. Where possible, I reused existing library workflows, but in some cases, I had to use the API to create a REST call and consume that in an action.
By downloading any code, package or file, you acknowledge that:
There is no explicit or implied warranty or support for the code. Neither Brian Ragazzi, his employer nor anyone else is responsible for any problems, errors, omissions, unexpected behavior, breakage, trauma, outage, fatigue, lost time, lost work or incontinence that may occur as a result of using the code or package.
Download the zip file. It contains the package and a couple of images that can be used for the advanced services
Import the Package
Extract the zip file
In the vCO Client, navigate to the packages tab.
Click the “import package” button and select the extracted .package file
On the Package Import Information step, click “Import”
Package Import Information
On the Import package… step, check the “Select/Deselect all” box to check all of the items. Please note the server path, these should not be duplicates of anything else you have in your vCO inventory (unless you’ve already imported this package previously). Click “Import Selected elements”.
Select all items
Review the workflows and actions added to your inventory.
Configure Advanced Services – Create Security Group
This service enables the user to create a new NSX Security Group and automatically adds its name to the appropriate dropdown list of security groups. It can be added once for each different list of security groups. You’ll need to know the exact name of the Property Dictionary and valuelist attribute you created in Part 1.
NSX Management ServicesNSX Security Groups in vRA Items
While logged into vRA as a service architect, navigate to the Advanced Services tab, click “Custom Resources“
We need to make vRA aware of NSX Security Groups. Click the Add button.
In the Orchestrator Type field, enter “NSX:SecurityGroup“; for the Name, I suggest “NSX Security Group“, click Next
Add NSX Security Group as Custom Resource
On the details form, we’re not going to make any changes, but if you wanted to hide certain properties, you could here. Click “Add“.
Click “Service Blueprints”, then the “Add” button.
On the Workflow tab, select the AddNewSecurityGrouptoDropdown workflow, click next.
Select “AddNewSecurityGrouptoDropdown” workflow
On the Details tab, set the name to something like “Create new Production NSX Security Group“, because we’re going to create the security group and add its name to the “production”dropdown list. Click Next.
Set the Service Item Name
On the Blueprint Form tab, under the “Step” Form page (default), mouseover the text field labelled “Name of Custom Property Dictionary in vCAC/vRA”. Click the pencil “edit” icon when it appears.
Edit the Form Fields
Click the Constraints tab of the “Edit Form Field” window. On the Value field, select “Constant” and enter “VCNS.SecurityGroup.Names.Production” (or whatever suffix you used) for the Property Dictionary. Set the Visible value to “No” so it doesn’t show up. Click Submit on the Edit Form Field window.
Set the name of the Property Dictionary to be updated
Using the same method, set the Name of the Attribute appropriately and its visibility to no
Edit the “Value to be appended to the ValueList attribute” field. Set the label to “New Security Group Name“. Do not set a value or make this one invisible, we need the user to enter a value, submit to save.
Edit the vCACIaaSHost field – using the Constraints tab again– when setting the value, choose constant, then click Add by the green plus, to display a treeview, where you can choose your connection to the IaaS Server. Visible: No, submit to save.
Select connection to IaaS host
Edit the “NSX endpoint” field in the same way, selecting the NSX connection.
When done, all fields except “New Security Group Name” will have a value. Click Next.
On the Provisioned Resource tab, select “securityGroup [NSX Security Group]“. Click Add to save the service blueprint.
Repeat steps 5-15 for any other dropdown lists containing security groups; say “Non-Production” for instance
Highlight the Service Blueprint and click “Publish” to make the blueprint available for entitlements
Navigate to Administration, Services.
Add a new Service named “NSX Management” (for example) – I included a nifty image in the zip file
Under Catalog Items, click the “Create new Production NSX Security Group” item to edit it.
The Catalog item should inherit the Security Group icon from vCO, set its Service to “NSX Management”,click update to save.
Create or Edit an entitlement to include the new Service and/or catalog item.
Try it out, confirm that the Security Group was created in NSX, is visible in vCAC items and it name was added to the Property Dictionary
Configure Advanced Services – Import Security Group
This service allows you to make existing security groups visible as items in the vCAC Items view. Once this is done, we’ll add actions that allow you to add the security group to a dropdown list.
Click “Service Blueprints”, then the “Add” button.
Select the “GetNSXSecurityGroup” workflow, click Next
On the details tab, set the name to “Import NSX Security Group“, click Next
On the Blueprint form, set the “connection” to the NSX connection in vCO, then hide the field. Security Group Name will be a dropdown list of existing NSX Security Groups for the user to choose from. Click Next
On the Provisioned Resource tab, select “securityGroup [NSX Security Group]“. Click Add to save the service blueprint.
Just as before, publish the service blueprint, add it to a service and an entitlement.
Configure Advanced Services – Add Security Group to Dropdown list
With this service, we’ll let the user add the name of an existing Security Group to a drop down list. Unlike the first two, this is implemented as a Resource Action, meaning it’ll be executed against an existing item (a Security Group in this case)
Under Resource Actions, click “Add”
For the Workflow, select the “AddExistingSecurityGrouptoDropdown“, click Next
On the “Input Resource” tab, keep NSX Security Group, click Next
On the Details tab, set the Name to “Add Security Group to Production list” or similar, set the description, leave the Type options unchecked. click Next
Set Action Name and Description
On the Form tab, just like the first service blueprint, set the Property Dictionary and Attribute names as appropriate. VCNS.SecurityGroup.Names.production in my example, set visible to no on both.
Again, we’ll set the vCACIaaSHost to the connection to the Server and hide the field
Click Add to save the action.
Repeat steps 1-6 for each security group dropdown list (say “non-production” for instance)
Publish the action and add it to an entitlement
Add Action to Entitlement
Test by navigating toNSX under Items, highlight a Security group and Select “Add Security Group to…” from the Actions menu.
Yay! A Resource Action
Configure Advanced Services – Add VM to a Security Group
This service lets you add a provisioned VM to additional Security Groups. So, at provisioning-time, the VM is added to the Security Group selected by the user, but we may need to refine the security by adding that VM to additional Security Groups.
Under Resource Actions, click “Add“
For the Workflow, select the “AddVMtoSecurityGroup“, click Next
On the “Input Resource” tab, keep IaaS VC VirtualMachine, click Next
On the Details tab, set the name to “Add VM to a Security Group“, click Next
On the Form tab, set the connection Value to the NSX connection.
Leave the NSX Security Group field visible, click Add to save the action
Publish the action and add it to an entitlement
Test by selecting a machine under Items and “Add VM to a Security Group” from the Actions menu
VM Resource Action for Security Groups
You’ll be presented with the list of allNSX Security Groups to which you can add the selected VM
Select Security Group
Conclusion
This part of the series should help streamline the management of VMs and their membership in Security Groups. Obviously, items like removing a VM from a Security Group or even removing a Security Group are not included here. The NSX plugin is missing quite a bit of functionality available in the API, so those additional functions require significantly more configuration.
Thanks to John Dias for his information and examples posted here.
In this series, I’ll document how to automate the creation and (some of) the management of NSX security groups within NSX.
First, what’s the use case? Why is this interesting? Let’s assume that you’ve decided to use large “flat” networks instead of many small networks. One reason you may make that decision is because of the challenges with either having many blueprints (one per network!) or making changes to the workflows to reliably set the appropriate properties.
Background
In this solution, we’ll have to have vCAC 6.1 or vRealize Automation 6.2, NSX 6.x and vCenter/vRealize Orchestrator with the vCAC and NSX plugins installed and configured. We have two Logical Switches, one for Production and one for Non-Production. In addition, there’s a corresponding network profile and the business groups have reservations. Now, we have to ensure that there are security boundaries within the flat networks. We’ll accomplish this through Security Groups.
Caveats
We’ll create security groups and nod in the direction of security profiles, but will not be automating the creation of security profiles nor their assignment to the Security Group(s). That can be done by the security admins through the NSX interface or maybe later we’ll add that capability too. 😉
Procedure
Create Security Groups.
Open vSphere Web Client and navigate to Networking and Security, then Service Composer.
Click the “New Security Group” icon
Enter a Name and Description for your new Security Group and click Next
If you want to create rules for dynamic membership or include/exclude existing VMs, you can do so in the subsequent steps. Finish the wizard.
Repeat to create all of your security groups
Create Security Groups in NSX
Create Property Dictionaries invCAC/vRA.
Log into vCAC as an Infrastructure Admin and navigate to Infrastructure|Blueprints|Property Dictionary
Click “New Property Definition”, for the name enter “VCNS.SecurityGroup.Names.Production“. You can replace “Production” with a name of your choosing, so you can have multiple lists.
Select “DropDownList” as the control type and check to make it required, click the green check to save.
Create Property Dictionary
Click the “Edit” link in the Property Attributes column
Click “New Property Attribute”, select “ValueList” as the attribute type
Set the name to something appropriate, such as the same name as the Property Definition or “ValueList” or “SecurityGroups”
In the Value field, enter the names of the security groups you want included. Separate the group names by commas (no spaces). If you have groups whose names include spaces or commas, put them in quotes. Click the green check to save.
Repeat to create another property dictionary and attribute for the Non-Production list
Update Blueprints.
Edit your “production” blueprints by adding the “VCNS.SecurityGroup.Names.Production” custom property. Set the value to your default security group or leave it blank to require a selection. Be sure to check the “Prompt User” box. Click the green check to save.
Add Custom Property to Blueprint
Test
Submit a request for the affected blueprint and verify that the dropdown list of security groups looks like you expect it to. Remember, that unlike many other custom properties in vCAC (eg: Network Profiles), you CAN have multiple versions of this one and display different lists.
Dropdown list of Security Groups
After a VMis provisioned, verify in the vSphere Web Client that ithas been assigned to the expected security group
VM added to Security Group
Next
In the next parts of this series, I plan to address the problems of maintaining the dropdown list manually and having a single security group per machine.
Please note that this is a workaround, not a fix. I couldn’t get the damn thing working reliably, so I bypassed authentication. I wish I knew why I got “DataBaseStatsService: ignoring exception: Error executing query usp_SeclectAgent Inner Exception: Error Executing query usp_SelectAgentCapablities” all the frigging time. Followed John’s advice and reinstalled MSDTC on e.v.e.r.y.t.h.i.n.g, no change. Made sure that the settings match VMKB2089583, no change.
As a workaround, I just selected “No Authentication required” on the Clustered MSDTC and the IaaS Manager Service services. Don’t do this as a long-term thing.
This is the second in my series for building a fully distributed vCAC deployment. In this part, we’re building the vPostgres database server with replication for use with vCAC 6.x.
I’m using v9.2.6.0. The vCAC 6.0 Support Matrix says 9.2.4 is supported but the PDF version of the Installation and Configuration guide says 9.2.4 or higher is supported. I originally wanted to use 9.3.2.0 because the documentation includes replication, but I’m unsure whether it’s officially supported with vCAC 6.x yet. We’ll still configure replication though 🙂 I’m going to front-end the vPostgres nodes with a vCNS Edge Gateway load balancer so that in the case of a failure, we don’t have to reconfigure the vCAC appliance database connection. Updated documentation shows that for vCAC 6.0, vPostgres v9.2.4 is supported, v9.2.6 and v9.3.4 were untested. For vCAC 6.1, versions 9.2.4, 9.2.6 and 9.3.4 are supported. Prerequisites:
Reserve IP addresses for the appliances and the virtual IP.
Add DNS entries for the IP addresses. I used vpostgres1 for vpostgres2 for the appliances and vpostgres as the virtual/load-balanced name/address.
vProgres setup Steps
Download the VMware vFabric Postgres Appliance from my.vmware.com.
Deploy the vFabric Postgres Appliance from OVF twice. I named them vPostgres1 and vPostgres2. vPostgres1 will be the master and vPostgres2 will be the slave.
Power on vPostgres1, browse to https://vpostgres1:5480, logon as root using the password you entered during deployment.
Configure the hostname (eg: vpostgres1.ragazzi.lab) and timezone
Browse to https://vpostgres1:8443, leave the default values, enter your password and click “Connect” to enter the Enterprise Manager (vpgdbem)
Login to vpgdbem
Click on localhost:5432/DB Login Users to list the existing users (just “postgres” so far)
Click the green plus to add a new DB Login user. In the properties, enter “vcac” (or whatever you want) as the name, check “Enable login”, do not check “Can create DB login users” and set the password. Click OK to save.
Create vcac user
Click on localhost:5432 to display the overview and list of databases (just “postgres” so far)
Click the green plus to Create a new database. Just enter “vcacdb” (or similar) for the name, set the Owner to “vcac”, add a comment if you wish and click “OK” to save. Click the refresh button (blue ccw arrow) to refresh the list.
Create vcacdb database
Expand the Databases item under the treeview and select your new “vcacdb” database. The database overview should load, displaying the uptime, size and more.
Select the database
Toward the right side of the window is a button labelled “Enter SQL”, click it.
Obviously, replace the red text with the IP address of the master vPostgres server. First you’ll be prompted for the password for the “replicate” user, then you’ll confirm the authenticity of the connection, then you’ll be prompted to enter the password for the postgres user on the master. Next, you’ll confirm that you want to enable WAL archiving on the primary/master by typing “yes” and lastly, you’ll confirm your intention to overwrite the data directory with the databases from the master. It’ll copy the tablespace over.
Configure replica and confirm
Run this command on vpostgres1 to verify the replication:
Load-Balancer setup steps
I’m going to use the load-balancer feature in vCloud Networking and Security Edge Gateway. It’s not the most intelligent Load-Balancer ever, but it’s what I have.
Using vCNS Manager, locate the appropriate edge gateway, click Actions|Manage to open it for editing
On the Configure Tab, edit the interface that will listen on the virtual IP
Edit the Subnet and add the Virtual IP. It’s probably not the primary IP. Save and publish those changes
Add the virtual IP to the Edge Gateay
On the Load Balancer tab, on the Pools page, click “Enable”, then “Publish Changes”
Click the green plus to add a load-balancing pool
Enter a recognizable Name and Description, click “Next”
On the Services step, check only TCP, set Balancing Method to “ROUND_ROBIN” and the Port to 5432. Click “Next”
On the Health Check step, set it as shown. Click “Next” when done.
On the members step, click the green plus to add the IP address of you SSO servers to the pool. Add the primary/master vPostgress server with a weight of 1 or higher. Add the slave/replica with a weight of 0 (zero). This will ensure all of the traffic goes to the primary until it is changed in the event of a primary failure. Keep the TCP port and Monitor Port at 5432 for each. Click “Next” once all you members are added.
Review the Ready to complete step and click “Finish” if it all correct
Click the Publish Changes Button before proceeding
Click the “Virtual Servers” link, then the green plus to add a Virtual Server
Enter a meaningful name and description, provide the Virtual IP adddress that you added to the edge earlier, select the Pool created in the steps above and Enable TCP on port 5432. Make sure the “Enabled” box is checked. Click “Add” then “Publish Changes”
Now, when you configure your vCAC Appliance, provide the host name that resolves to the virtual IP address.
Dealing with a failure
By default, the replica acts like a read-only copy of the database. It has a very short replication delay, so do not count on it to save you if you delete things from the primary.
When to promote a replica:
You’ve screwed up the network settings on the primary vPostgres node beyond repair; preventing vCAC from using it and replication from occurring
You’ve applied an update to the primary vPostgres node that broke it; preventing vCAC from using it and replication from occurring
When to NOT promote a replica
You deleted a bunch of stuff from vCAC. Too late! Those changes have already replicated
The physical host where the primary vPostgres virtual appliance was running has failed. Just wait for vSphere HA to being it back online
You want to see it run active/active. It does’t do that. relax
Recovery Procedure
See if the primary/master node is up. If it is, stop here.
Using the vCNS Manager web interface, edit the load-balancing pool, setting the weight for vpostgres1 (which has failed) to 0 (zero) and the weight for vpostgres2 (which we’re going to promote) to 1. Save and publish changes.
If/When vpostgres1 comes back to life, you’ll need to configure it as a replica to vpostgres2. Do this by running the command from step 19 above.
Now if you want to make vpostgres1 primary again, I strongly suggest you stop the vcac_service on your vCAC appliances. Then, you’ll just promote it like you did before and make vpostgres2 a replica again.
I love the simplicity of the vCenter Server Appliance and the VMware Identity Appliance for vCAC, but neither offer a high availability option better than vSphere HA. There are use cases where you’d need your SSO service to offer better uptime and resilience. In addition, there is some SSL certificates to be configured and for that, we’ll follow the instructions in KB2034833, KB2061934 and KB2034181.
Notes, caveats, warnings
AFAIK, this will only work with vSphere 5.5. v5.1 handles SSO differently. I’m only using two nodes, if you have more, there will be extra steps. I do not have intermediate CAs, if you do, consult the KBs for the additional steps. I’m going to use a vCloud Networking and Security Edge Gateway as my load-balancer. It does not offer SSL offload like some other load-balancers do, so you may have to take extra steps to configure SSL offload.
Here’s what I have in mind; load-balanced SSO Servers
Prerequisites
Reserve the IP addresses for your actual SSO servers, plus the Virtual IP address.
Add A or CNAME records to your DNS for the SSO servers and the virtual IP.
The DNS name of the virtual IP is what the SSL certificate must match (vcsso in my case)
You should have an edge gateway already configured with an interface in the same networks as your virtual IP and actual SSO servers.
First SSO Server
I’m starting with two freshly deployed Windows Server 2008 R2 VMs, joined to the domain and named vcsso1 and vcsso2. On vcsso1, install the Single Sign-on service. Be sure the prerequisites are all ok.
On the deployment mode step, choose “vCenter Single Sign-On for your first vCenter Server”
Next,next,finish your way through the installation. You’ve set up an SSO server, YAY!
Second SSO Server
On the second server, vcsso, also install the SSO service. We’re going to make a few different selections than we did on vcsso1 though. On the deployment mode step, here we’re going to select “vCenter Single Sign-On for an additional vCenter Server in an existing site”.
Next, we’re prompted for information about the first, or partner, SSO server.
We have to confirm that the information obtained from the first SSO server is correct, so click Continue.
Then we select the site name configured on the first SSO server. I named mine “Lab”, but you can leave yours as “Default-First-Site” or whatever makes sense for your environment.
From here, you’ll Next,Next,Finish your way to completion.
Generating the Cert
Prerequisites: Either the VMware ssl-certificate-updater-tool or OpenSSL Win32 v0.9.8
Log on to the first SSO server (vcsso1), extract the VMware SSL certificate updater tool to C:\ssltool or similar. Create folders named “C:\certs\sso“. Open notepad and paste the following:
[ req ]

default_bits = 2048

default_keyfile = rui.key

distinguished_name = req_distinguished_name

encrypt_key = no

prompt = no

string_mask = nombstr

req_extensions = v3_req
[ v3_req ]

basicConstraints = CA:FALSE

keyUsage = digitalSignature, keyEncipherment, dataEncipherment

extendedKeyUsage = serverAuth, clientAuth

subjectAltName = DNS:ServerShortName, IP:ServerIPAddress, DNS:server.domain.com, DNS:ServerIPAddress
[ req_distinguished_name ]

countryName = Country

stateOrProvinceName = State

localityName = City

0.organizationName = Company Name

organizationalUnitName = vCenterSSO

commonName = server.domain.com
Replace the values in red with those appropriate for your environment. Be sure to specify the server name and IP address as the Virtual IP and its associated DNS record. Save the file as c:\certs\sso\sso.cfg
At a command prompt, navigate to the folder containing openssl.exe (eg: C:\ssltool\tools\openssl). Run this command to create the key and certificate site request (CSR):
Follow the steps in KB2062108 to create the appropriate certificate template in you Active Directory Certificate Authority.
Log into the Microsoft CA certificate authority Web interface. By default, it is http://servername/CertSrv/.
Click the Request a certificate link.Click advanced certificate request.
Click the Submit a certificate request by using a base-64-encoded CMC or PKCS #10 file, or submit a renewal request by using a base-64-encoded PKCS #7 file link.
Open the certificate request (rui.csr) in notepad. Copy the content between —–BEGIN CERTIFICATE REQUEST—– and —–END CERTIFICATE REQUEST—–
Paste the copied content into the “Base-64-encoded certificate request” textarea. Select VMware Certificate as the Certificate Template. See KB2062108 if you don’t have the “VMware Certificate” template
Click Submit to submit the request.
Click Base 64 encoded on the Certificate issued screen. Click the Download Certificate Chain link.
Save the package as C:\certs\certnew.p7b.
Double-click the p7b to open it in certmgr. Navigate to Certificates – Current User\C:\Certs\Certnew.p7b\Certificates.
Certs in P7b
You’ll see two certificates here (unless you have intermediate certificates, then you’ll have more).
Right-click the one for the SSO server, choose All Tasks|Export. Save the file as Base-64 encoded X.509 (.CER) to c:\certs\sso\rui.crt
Right-click the one for root CA server, choose All Tasks|Export. Save the file as Base-64 encoded X.509 (.CER) to c:\certs\root.cer .. Close certmgr.
Note: The certificate store password must be changeme and the key alias must be ssoserver. Do not change these parameters.
Install and Configure the Certificate
While logged on to the first SSO server (vcsso1) as an administrator, make sure this folder exists: C:\Program Files\Common Files\VMware vCenter Server – Java Components If it doesn’t, you’ll need to check your SSO installation
Open an elevated command prompt (as administrator) and enter the following
SET JAVA_HOME=C:\Program Files\Common Files\VMware vCenter Server - Java Components

SET PATH=%PATH%;C:\Program Files\VMware\Infrastructure\VMware\CIS\vmware-sso;%JAVA_HOME%\bin
In the command prompt, cd to the folder containing openssl.exe (eg: C:\ssltool\tools\openssl)
Generate a subject hash from the certificate using this command:
This will return an 8-character hash. Record it, we’ll need it later
On both SSO servers, create the folder C:\ProgramData\VMware\SSL
On both SSO servers, copy c:\certs\root.cer to C:\ProgramData\VMware\SSL renaming it to ca_certificates.crt
On both SSO servers, copy c:\certs\root.cer to C:\ProgramData\VMware\SSL again, this time renaming it to <subjecthash>.0 (replacing <subjecthash> with your hash value from above and appending dot zero)
Just on the first SSO server, paste the following into a text file named c:\certs\gc.properties. Replace the red text with appropriate values.
[service]

friendlyName=The group check interface of the SSO server

version=1.5

ownerId=

productId=product:sso

type=urn:sso:groupcheck

description=The group check interface of the SSO server
[endpoint0]

uri=https://SSOserver.domain.com:7444/sso-adminserver/sdk/vsphere.local

ssl=c:\certs\Root64.cer

protocol=vmomi
Paste the following into a text file named c:\certs\admin.properties. Replace the red text with appropriate values.
[service]

friendlyName=The administrative interface of the SSO server

version=1.5

ownerId=

productId=product:sso

type=urn:sso:admin

description=The administrative interface of the SSO server
[endpoint0]

uri=https://SSOserver.domain.com:7444/sso-adminserver/sdk/vsphere.local

ssl=c:\certs\Root64.cer

protocol=vmomi
Paste the following into a text file named c:\certs\sts.properties. Replace the red text with appropriate values.
[service]

friendlyName=STS for Single Sign On

version=1.5

ownerId=

productId=product:sso

type=urn:sso:sts

description=The Security Token Service of the Single Sign On server.
[endpoint0]

uri=https://SSOserver.domain.com:7444/sts/STSService/vsphere.local

ssl=c:\certs\Root64.cer

protocol=wsTrust
Next, we need the service ID for each of the three services SSO uses. To get these, run the following command, replacing the red text with the FQDN to your first SSO server:
Stop and restart the VMware Secure Token Service on both servers
Preparing to load-balance
Navigate to http://firstssoserver.domain.local:7444/sts/STSService/vsphere.local notice that the certificate gives an error, but look at the cert. The certificate should return the “common” name (in my case, “vcsso” instead of “vcsso1”. Repeat this for the second and subsequent SSO servers, verifying that they provide the same certificate
Using vCNS Manager, locate the appropriate edge gateway, click Actions|Manage to open it for editing
On the Configure Tab, edit the interface that will listen on the virtual IP
Edit the Subnet and add the Virtual IP. It’s probably not the primary IP. Save and publish those changes
Add the virtual IP to the Edge Gateay
On the Load Balancer tab, on the Pools page, click “Enable”, then “Publish Changes”
Click the green plus to add a load-balancing pool
Enter a recognizable Name and Description, click “Next”
On the Services step, check HTTPS, set Balancing Method to “ROUND_ROBIN” and the Port to 7444. Clck “Next”
On the Health Check step, set it as shown. Click “Next” when done.
On the members step, click the green plus to add the IP address of you SSO servers to the pool. I suggest keeping the weifght for each at 1, unless you have a reason to send more requests to specific nodes. Keep the HTTPS port and Monitor Port at 7444 for each. Click “Next” once all you members are added.
Review the Ready to complete step and click “Finish” if it all correct
Click the Publish Changes Button before proceeding
Click the “Virtual Servers” link, then the green plus to add a Virtual Server
Enter a meaningful name and description, provide the Virtual IP adddress that you added to the edge earlier, select the Pool created in the steps above and Enable HTTPS on port 7444. Set the Persistence Method to SSL_SESSION_ID and make the “Enabled” box is checked. Click “Add” then “Publish Changes”
Test by navigating to https://ssovirtual.domain.local:7444/lookupservice/sdk and https://ssovirtual.domain.local:7444/sts/STSService/vpshere.local verifying that the certificates match.
YAY, load-balanced SSO with matching SSL certs!
One more thing….
Using your favorite web browser, navigate to http://ssovirtual.domain.local:7444/websso/SAML2/Metadata/vsphere.local you’ll be prompted to download and save an XML file named vsphere.download. Now open the XML file in notepad or Notepad++. First, make sure you received a readable XML file. Second, noticed that the EntitiesDescriptor/EntityDescriptor entityID property is server-specific. We’ll need both servers to respond with the same information.
<EntitiesDescriptor xmlns="urn:oasis:names:tc:SAML:2.0:metadata" xmlns:saml="urn:oasis:names:tc:SAML:2.0:assertion" xmlns:vmes="http://vmware.com/schemas/attr-names/2012/04/Extensions" Name="vsphere.local" validUntil="2014-08-12T23:54:04Z">

<Extensions>

<vmes:ExportedOn>2014-08-11T23:54:04Z</vmes:ExportedOn>

<vmes:ExportedBy>Exported by VMware Identity Server (c) 2012</vmes:ExportedBy>

</Extensions>

<EntityDescriptor entityID="https://VCSSO1.domain.local:7444/websso/SAML2/Metadata/vsphere.local">

<IDPSSODescriptor WantAuthnRequestsSigned="false" protocolSupportEnumeration="urn:oasis:names:tc:SAML:2.0:protocol">

<KeyDescriptor xmlns:ds="http://www.w3.org/2000/09/xmldsig#" use="signing">

<ds:KeyInfo>

<snip...>
Warning This is not in a VMware KB, and may not be best way to do it. Having the value in the EntitiesDescriptor/EntityDescriptor entityID property match the FQDN is going to be very important in the near future. Trust me.
On each server, open C:\ProgramData\VMware\CIS\cfg\vmware-sso\hostname.txt. It only contains the resolved hostname, so update it to the virtual hostname (vcsso.ragaazzi.lab in my case) save the file
Retrieve the XML file from http://ssovirtual.domain.local:7444/websso/SAML2/Metadata/vsphere.local again open it and confirm that it contains the virtual hostname
Conclusion
This was such a lengthy post, I considered breaking it up, but there was no good break-point. Thanks for sticking with it. This is mostly for my own benefit, hopefully you’ll find it helpful too.
For this sequence, we’ll still use part 1 to set up the Build Profile and Property Dictionary, but these steps will replace part 2 and some of part 3.
Review
Recall that for this example, the name should use the initials of the Business Group, “V” for Virtual, a single letter for the OS (“W” for Windows, “L” for Linux, “S” for Solaris, “O” for other), a three character “role” and a two digit sequence number for uniqueness.
Example Naming convention:
BG1VWAPP14
BG1 = Business Group initials
V = Virtual
W = Windows
APP = APPlication server
14 = Sequence number
vCenter Orchestrator Workflow
Create a Folder for your workflows outside of the “Library” and other folders
Inside this folder, create a new workflow. I named mine “vCAC.MachineName“. The workflow will be opened for editing.
Navigate to the “In” tab, add this attribute
Name
Type
Value
Description
CharacterToReplace
String
–
What Character in the original name will be replaced
Navigate to the “Inputs” tab, add these Parameters:
Name
Type
Description
OriginalName
string
ex: SUP-02
OperatingSystem
string
ex: Windows 2008 R2
Role
string
ex: SQL
Navigate to the “Outputs” tab, add this Parameter:
Name
Type
Description
newMachineName
string
Name created from component values
From the “Generic” pane, drag the “scriptable task” item to the blue arrow.
Default schema
Mouseover the scriptable task item in the schema and click the Pencil icon to edit the item
Edit the Scriptable Task
On the “IN” tab of the scripting task properties, click the “Bind to workflow parameter/attribute” button to add these parameters:
Scriptable Tasks IN Parameters
On the “OUT” tab of the scripting task properties, click the “Bind to workflow parameter/attribute” button to add these parameters:
Scriptable Tasks OUT Parameter
Open the Schema tab of the Workflow.
Paste the following:
var OS;

OS="O" //"O" not zero, for "Other"

OperatingSystem = OperatingSystem.toUpperCase();

if (OperatingSystem.search("WIND")> -1) {OS="W"};

if (OperatingSystem.search("RHEL")> -1) {OS="L"};

if (OperatingSystem.search("SLES")> -1) {OS="L"};

if (OperatingSystem.search("SOLA")> -1) {OS="S"};

Role='V'+OS+Role.substring(0,3); //"V" for Virtual

newMachineName = OriginalName.replace(CharacterToReplace,Role).toUpperCase();
I’m not much of a javascript coder, so this is probably not the best way to write this. But, it worked for me. Close the scriptable task editing window.
Back on the Schema tab of the workflow, let’s test our code. Click the “Run” button, enter some values in the fields and click submit.
Test Run workflow
When the workflow finishes, check the Variables tab on the right to confirm that the newMachineName parameter has the expected value.
Resulting newMachineName
If satisfied, click “Save and close” to save your new workflow
vCAC Workflow
There are only two changes to be made from the steps outlined here. The first is in Step 3, instead of using a variable named “PowerShellOutVar“, we’re just going to name it “OutVar” for obvious reasons. The second change is a replacement of step 7, do this instead:
From the DynamicOps.VcoModel.Activities toolbox, drag “InvokeVcoWorkflow” to the designer.
InvokeVcoWorkflow
Click the ellipsis button to display a list of the workflows in vCO, select the workflow we made earlier (vCAC.MachineName in this case). Note that you can filter on the Folder to make it easier to find.
Set the parameters
Direction
Name
expression/value
Input
OriginalName
vmName
Input
OperatingSystem
vmwareOS
Input
Role
machineRole
Output
newMachineName
OutVar
Variables & Parameters
Continue with the remainder of the steps, remembering that when you link it up in step 12, you’ve replaced “InvokePowerShell” with “InvokeVcoWorkflow“
First, there’s no official automated procedure for the migration yet. Here is a method to get some of your vCD-managed VMs into vCAC.
Because vCD names the actual VM with an ugly UID, we want to clone the VM to a “nice” name with vSphere. As always, make sure you have sufficient room on your storage. The destination cluster for the clone should already be included as a compute resource in vCAC/IaaS.
In the vSphere Web Client, edit the clone VM, navigate to the “vApp Options” tab and uncheck “Enable vApp Options”. This removes the vCloud Director properties from the VM.
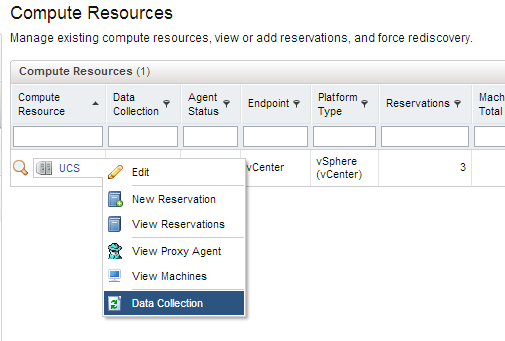
Request (or wait for) an inventory data collection to run against the compute resource in vCAC.Request an Inventory update for the Compute Resource
Login to vCAC as a Fabric Admin, navigate to Infrastructure|Infrastructure Organizer|Infrastructure Organizer.
Click “Next” on step 1 of the Infrastructure Organizer wizard
On step 2, check the box beside the Compute Resource that contains the clone VM, click “Next”.
On step 3, ensure your compute resource is assigned to a Fabric Group and, optionally, a Cost Profile, click “Next” to continue.
In step 4, you’ll be presented with a list of the VMs in the compute cluster that are not managed by vCAC. For each VM to be imported, click the pencil to edit it and assign to a Business Group. Any VMs you do not want to import, just do not assign to a Business Group. Click “Next” when done.
In step 5, you’ll edit your selected VMs to assigning them to an existing Blueprint, Reservation and Owner. This is done so that vCAC knows how to handle the VM’s lease, resource allocation and who has access. Next!
Last Step, verify how many machines will be registered. Click Finish to complete the import.
Once the VMs are imported, the owner or appropriate Business Group Manager can logon to vCAC, find the VM under his or her items and power it on from there.
Lastly, once the VM’s operation is verified, the original VM in vCloud Director should be backed up and removed.
Notes
This is not intended to import a vApp into a multiple-machine blueprint or similar. This is just for importing individual VMs into a Business Group.
I used vCloud Director v5.5.1.1 and vCloud Automation Center v6.0.1.1.
The documentation for (vFabric) vCloud Application Director is pretty sparse in this area, so here’s what worked for me.
Preparation:
You should have some idea how you want App Director to get its information from Active Directory. You can point it at a single domain controller (or GC) or a virtual IP address if you have them behind a load-balancer.
In my case, I have only two domain controllers and they’re both configured as Global Catalog servers. AD-integrated DNS is used and the “(same as parent folder)” A records in the zone resolve to the domain controllers. Only point the integration at the domain FQDN if all of the possible responders listen on the same port.