Prerequisite: A reachable S3 endpoint. Can be local or remote, but the pods must be able to resolve its name or IP. Create or select and existing bucket for your database backups. In this case, I have a minio instance running on-prem with a bucket named backup-mysql.
Create a secret for the S3 endpoint credentials. This account will need to be able to write to the database backup bucket. Here’s an example:
Create a TanzuMySQLBackupLocation. In the example below, we’re not using SSL with the minio endpoint, so I’m explicitly using port 80. More examples and details are found here. I like to keep the backups organized, so I’ll create a backup location for each instance and specify an bucketPath for each.
Test with a one-off backup. Create and apply a yaml like the following to request a backup without a schedule. Here’s an example yaml for a one-off backup for the mysql-ha instance to its corresponding backup location:
Apply this kubectl apply -n mysql-instances -f backupschedule-mysql-ha-daily.yaml
I found that (unlike Velero), when applying the MySQLBackupSchedule, a backup does not immediately begin. At the scheduled time however, a pod for the backup schedule will be created to run the backup job. This pod will remain intact to run subsequent backup jobs.
Backup Pods and created Backup objects
Lastly, regarding backups, keep in mind that the backup data on the S3 endpoint never expires, the backups will remain there until removed manually. This may be important if you have limited capacity.
Restore/Recover
From the docs:
MySQLRestores always restores to a new MySQL instance to avoid overwriting any data on an existing MySQL instance. The MySQL instance is created automatically when the restore is triggered. Tanzu MySQL for Kubernetes does not allow you to restore a backup to an existing MySQL instance. Although you can perform this manually by copying the MySQL data from the backup artifact onto an existing MySQL instance, VMware strongly discourages you from doing this because you might overwrite existing data on the MySQL instance.
So, we should not expect to restore directly to a running database instance. If we need to recover, we’ll create a new instance and restore the backup to it.
To create a restore, we’ll need the name of the MySQLBackup object to restore from and a name of a database to create from that backup as part of the restore. We’ll put that into a yaml like the one below. Notice that we provide a spec for a new database, I wanted a loadbalancer for it although we are able to repoint the existing loadbalancer to the new proxy nodes (for ha) or the new database node (for standalone)
Apply the yaml to create the restore kubectl apply -n mysql-instances -f ./restore-ha.yamlYou should see a new database pending and a MySQLRestore object running:
Job is running and instance is pendingRestore job succeeded and there is a new mysql instance
Now, the choice if yours to copy data from the restored database back to the original or to point the applications to the new database or to point the loadbalancer at the new database.
If you choose to repoint the existing load-balancer to the new database, here’s an example how to do that:
kubectl patch service -n mysql-instances mysql-ha -p '{"spec":{"selector":{"app.kubernetes.io/instance": "restored-mysql-database"}}}'
As a follow up to the getting started post, let’s touch on what it takes to configure a MySQL instance for High Availability in Tanzu SQL/MySQL
Why this is important
In kubernetes, pods are generally treated as transient and ephemeral, they can be restarted quickly and are often stateless. This is certainly not the case with databases. We need to make sure our databases remain online and usable. MySQL itself provides a means to do High Availability with multiple instances and synchronization; we’ll be leveraging this capability today.
High Availability Architecture
Blatantly ripped off from the official docs
Unlike our stand-alone instance when create an instance with HA enabled, the operator creates FIVE pods and two services for us.
Pods created for HA instanceServices created for HA instance
You’ll notice that the mysql-ha LoadBalancer uses the proxy pods as its endpoints and the mysql-ha-members uses the database pods themselves.
Create an HA instance
In this example, I’m going to reuse the “harbor” docker-registry secret we created originally, but we’ll want a new tls certificate for this instance.
Create the TLS certificate
Just like previously, save the following as cert-ha.yaml and apply it with kubectl -n mysql-instances -f cert-ha.yaml to create a certificate for our instance. Adjust the names to match your environment of course. Notice the issuerRef.name is ca-issuer
apiVersion: cert-manager.io/v1
kind: Certificate
metadata:
  name: mysql-ha-secret
spec:
  # Secret names are always required.
  secretName: mysql-ha-secret
  duration: 2160h # 90d
  renewBefore: 360h # 15d
  subject:
    organizations:
    - ragazzilab.com
  # The use of the common name field has been deprecated since 2000 and is
  # discouraged from being used.
  commonName: mysql-ha.ragazzilab.com
  dnsNames:
  - mysql-ha.ragazzilab.com
  - mysql-ha
  - mysql-ha.mysql-instances.svc.cluster.local
  # Issuer references are always required.
  issuerRef:
    name: ca-issuer
    # We can reference ClusterIssuers by changing the kind here.
    # The default value is Issuer (i.e. a locally namespaced Issuer)
    kind: Issuer
    # This is optional since cert-manager will default to this value however
    # if you are using an external issuer, change this to that issuer group.
    group: cert-manager.io
Create the instance
The only differences are highAvailability.enabled:true and the name of the certificate secret
apiVersion: with.sql.tanzu.vmware.com/v1
kind: MySQL
metadata:
  name: mysql-ha
spec:
  storageSize: 2Gi
  imagePullSecret: harbor
#### Set highAvailability.enabled:true to create three pods; one primary and two standby, plus two proxy pods
  highAvailability:
    enabled: true

#### Set the storage class name to change storage class of the PVC associated with this resource
  storageClassName: tanzu

#### Set the type of Service used to provide access to the MySQL database.
  serviceType: LoadBalancer # Defaults to ClusterIP

### Set the name of the Secret used for TLS
  tls:
    secret:
      name: mysql-ha-secret
Apply this as usual: kubectl apply -n mysql-instances -f ./mysql-ha.yaml
Create a database user
The steps to create the database user in an HA instance are just like those for the standalone instance once we determine which Pod is the primary/active and writable one. I was unable to make the one-liner method in the official docs work, so here’s what I did instead.
Get the MySQL root password: kubectl get secret -n mysql-instances mysql-ha-credentials -o jsonpath='{.data.rootPassword}' | base64 -D
Get a shell on the mysql-ha-0 pod: kubectl -n mysql-instances exec --stdin --tty pod/mysql-ha-0 -c mysql -- /bin/bash
Get into the mysql cli: mysql -uroot -p<root password>
Identify the Primary member: SELECT MEMBER_HOST, MEMBER_ROLE FROM performance_schema.replication_group_members;
If the primary node is mysql-ha-0 (the one we’re on), proceed to the next step. If it is not, go back to step step 2 to get a shell on the pod that is primary.
Now, we should be on the mysql cli on the primary pod/member. Just like with the standalone instance, let’s create a user:
CREATE USER 'admin'@'%' IDENTIFIED BY 'password';
  GRANT ALL PRIVILEGES ON * . * TO 'admin'@'%';
  FLUSH PRIVILEGES;
Type exit twice to get out of mysql and the pod.
Ok, so now, we have a running instance of mysql and we’ve created a user account that can manage it (cannot login remotely as root). We can connect phpMyAdmin to the instance using the admin credentials:
Let’s deploy Tanzu SQL with MySQL on Kubernetes and use phpMyAdmin to interact with our
database secured with TLS
VMware Tanzu SQL with MySQL for Kubernetes is quite a mouthful. For this post, I’ll refer to the product as Tanzu SQL/MySQL. We’re going to deploy it onto an existing Tanzu Kubernetes Grid cluster.
Objectives:
Deploy Tanzu SQL with MySQL on Kubernetes
Use phpMyAdmin to interact with our databases
Secure database instances with TLS
Cluster Setup
Tanzu SQL/MySQL can run on any conformant kubernetes cluster, if you already have one running, you can skip ahead. If, like me, you want to provision a new TKG cluster for Tanzu SQL/MySQL, you’ll want settings like this:
K8s version 1.18 or 1.19 or 1.20.7
Additional volume on /var/lib/containerd for the images
For a test cluster, best-effort small control-plane nodes (3) and best-effort-medium worker nodes (2) is sufficient to start, YMMV.
Install metrics-server and add appropriate PSPs
Get the images and chart
You’ll need to login to pivnet and registry.pivotal.io, accept the EULA for VMware Tanzu SQL with MySQL for Kubernetes.
At a command-line, run:docker login registry.pivotal.io then, provide your credentials. This is so that docker can pull down the images from VMware. Login to your local container registry as well – you’ll need permissions to push images into your project.
In the following commands, replace “{local repo}” with the FQDN for your local registry and “{project}” with the project name in that repo that you can push images to.
In the tanzu-sql-with-mysql-operator folder created by the helm export, copy values.yaml to values-override.yaml. Edit the keys with the correct values (we haven’t created the harbor secret yet, but we’ll name it the value you provide here). Here’s an example:
imagePullSecret: harbor
operatorImage: {local repo}/{project}/tanzu-mysql-operator:1.0.0"
instanceImage: {local repo}/{project}/tanzu-mysql-instance:1.0.0"
resources:
  limits:
    cpu: 100m
    memory: 128Mi
  requests:
    cpu: 100m
    memory: 128Mi
Deploy Operator
We’ll want to create namespace, a docker-registry secret (named harbor in the example below) and then install the chart.
Let’s check that the pods are running by running kubectl get po -n tanzu-mysql
Before Creating an Instance…
We’ll need to create a namespace to put our mysql instances, a secret in that namespace in order to pull the images from our local repo, and a way to create TLS certificates and phpMyAdmin. These commands will create the namespace, create the docker-registry secret and install cert-manager:
Cert-manager uses issuers to create certificates from cert-requests. There are a variety of issuers supported, but we must have the ca certificate included in the resulting certificate secret – something not all issuers do. For example, self-signed and ACME are not suitable as they do not appear to include the ca certificate in the cert secret. Luckily, the CA issuer works fine and can use a self-signed issuer as its own signer. Save the following as a yaml file to create a self-signed issuer, root cert and a CA issuer and apply it with kubectl -n mysql-instances -f cabootstrap.yaml
Save the following as cert.yaml and apply it with kubectl -n mysql-instances -f cert.yaml to create a certificate for our instance. Adjust the names to match your environment of course. Notice the issuerRef.name is ca-issuer
apiVersion: cert-manager.io/v1
kind: Certificate
metadata:
  name: mysql-tls-secret
spec:
  # Secret names are always required.
  secretName: mysql-tls-secret
  duration: 2160h # 90d
  renewBefore: 360h # 15d
  subject:
    organizations:
    - ragazzilab.com
  # The use of the common name field has been deprecated since 2000 and is
  # discouraged from being used.
  commonName: mysql-tls.mydomain.local
  dnsNames:
  - mysql-tls.mydomain.local
  - mysql-tls
  - mysql-tls.mysql-instances.svc.cluster.local
  # Issuer references are always required.
  issuerRef:
    name: ca-issuer
    # We can reference ClusterIssuers by changing the kind here.
    # The default value is Issuer (i.e. a locally namespaced Issuer)
    kind: Issuer
    # This is optional since cert-manager will default to this value however
    # if you are using an external issuer, change this to that issuer group.
    group: cert-manager.io
Confirm that the corresponding secret contains three files: ca.crt, tls.crt, tls.key by using kubectl describe secret -n mysql-instances mysql-tls-secret
Create an instance and add a user
Here is an example yaml for a MySQL instance. This will create an instance name mysql-tls, using the docker-registry secret named harbor we created earlier and the certificate secret we created above named mysql-tls-secret and use a LoadBalancer IP so we can access it from outside of the cluster.
apiVersion: with.sql.tanzu.vmware.com/v1
kind: MySQL
metadata:
  name: mysql-tls
spec:
  storageSize: 2Gi
  imagePullSecret: harbor

#### Set the storage class name to change storage class of the PVC associated with this resource
  storageClassName: tanzu

#### Set the type of Service used to provide access to the MySQL database.
  serviceType: LoadBalancer # Defaults to ClusterIP

### Set the name of the Secret used for TLS
  tls:
    secret:
      name: mysql-tls-secret
Apply this yaml to the mysql-instances namespace to create the instance: kubectl apply -n mysql-instances -f ./mysqlexample.yaml
Watch for two containers in the pod to be ready
Watch for the mysql-tls-0 pod to be running with 2 containers. When the instance is created, the operator also creates a secret containing the root password. Retrieve the root password with this command: kubectl get secret -n mysql-instances mysql-tls-credentials -o jsonpath='{.data.rootPassword}' | base64 -D Retrieve the load-balancer address for the MySQL instance with this command: kubectl get svc -n mysql-instances mysql-tls
LoadBalancer address for our instance
Login to Pod and run mysql commands
Logging into the pod, then into mysql
Run this to get into a command prompt on the mysql pod: kubectl -n mysql-instances exec --stdin --tty pod/mysql-tls-0 -c mysql -- /bin/bash Once in the pod and at a prompt, run this to get into the mysql cli as root: mysql -uroot -p<root password> Once at the mysql prompt, run this to create a user named “admin” with a password set to “password” (PLEASE use a different password!)
  CREATE USER 'admin'@'%' IDENTIFIED BY 'password';
  GRANT ALL PRIVILEGES ON * . * TO 'admin'@'%';
  FLUSH PRIVILEGES;
Type exit twice to get out of mysql and the pod.
Ok, so now, we have a running instance of mysql and we’ve created a user account that can manage it (cannot login remotely as root).
Deploy, Configure and use phpMyAdmin
There are several ways to do this, but I’m going to go with kubeapps to deploy phpMyAdmin. Run this to install kubeapps with a loadbalancer front-end:
Find the External IP address for kubeapps and point a browser at it: kubectl get svc -n kubeapps kubeapps. Get the token from your .kube/config file to paste into the token field in kubeapps and click submit. Once in kubeapps, be sure to select the kubeapps namespace – you should see kubeapps itself under Applications.
logged into kubeapps in the kubeapps namespace
Click “Catalog” and type “phpmyadmin” into the search field. Click on the phpmyadmin box that results. On the next page, describing phpmyadmin, click the Blue deploy button.
Now, you should be looking at a configuration yaml for phpmyadmin. First, set the Name up top to something meaningful, like phpmyadmin, the scroll down to line 256, you should see the service type currently set to ClusterIP, replace ClusterIP with LoadBalancer.
Set the name and service type
Then scroll the rest of the way to click the blue “Deploy X.Y.Z” button and hang tight. After it deploys, the Access URLs will show the IP address for phpMyAdmin.
Access URLs for phpmyadmin after deployment
Click the Access URL to get to the Login page for phpMyAdmin and supply the IP Address of the mysql instance as well as the admin username and password we created above, then click Go.
Login to instance IP with the account we made earlier
Now you should be able to manage the databases and objects in the mysql instance!
phpmyadmin connected to our instance!
Notes
Kubernetes v1.20. There are filesystem permissions set on Tanzu Kubernetes Grid image 1.20.2 that prevent the MySQL instance pods from running. On TKG or vSphere with Tanzu, use v1.20.7 instead.
You don’t have to use cert-manager if you have another source for TLS certificates, just put the leaf cert, private key and ca cert into the secret referenced by the mysql instance yaml.
Looks like you can reuse the TLS cert for multiple databases, just keep in mind that if you connect using a name/fqdn that is not in the cert’s dnsNames, you may be a cert error.
This example uses Tanzu Kubernetes Grid Service in vSphere with Tanzu on vSphere 7 Update 2 using NSX-ALB.
A new feature added to TKGS as of 7.0 Update 2 is support for adding private SSL certificates to the “trust” on TKG cluster nodes.
This is very important as it finally provides a supported mechanism to use on-premises Harbor and other image registries.
It’s done by adding the encoded CAs to the “TkgServiceConfiguration”. The template for the TkgServiceConfiguration looks like this:
apiVersion: run.tanzu.vmware.com/v1alpha1
kind: TkgServiceConfiguration
metadata:
  name: tkg-service-configuration
spec:
  defaultCNI: antrea
  proxy:
    httpProxy: http://<user>:<pwd>@<ip>:<port>

  trust:
    additionalTrustedCAs:
      - name: first-cert-name
        data: base64-encoded string of a PEM encoded public cert 1
      - name: second-cert-name
        data: base64-encoded string of a PEM encoded public cert 2
Notice that there are two new sections under spec; one for proxy and one for trust. This article is going to focus on trust for additional CAs.
If your registry uses a self-signed cert, you’ll just encode that cert itself. If you take advantage on an Enterprise CA or similar to sign your certs, you’d encoded and import the “signing”, “intermediate” and/or “root” CA.
Example
Let’s add the certificate for a standalone Harbor (not the built-in Harbor instance in TKGS, its certificate is already trusted)
Download the certificate by clicking the “Registry Certificate” link
Run base64 -i <ca file> to return the base64 encoded content:
Provide a simple name and copy and paste the encoded cert into the data value:
Apply the TkgServiceConfiguration
After setting up your file. Apply it to the Supervisor cluster:
kubectl apply -f ./TanzuServiceConfiguration.yaml
Notes
Existing TKG clusters will not automatically inherit the trust for the certificates
Clusters created after the TKGServiceConfiguration is applied will get the certificates
You can scale an existing TKG cluster to trigger a rollout with the certificates
You can verify the certificates exist by connecting through SSH to the nodes and locating the certs under /etc/ssl/certs:
In TKGS on vSphere 7.0 through (at least) 7.0.1d, a Harbor Image Registry may be enabled for the vSphere Cluster (Under Configure|Namespaces| Image Registry). This feature currently (as of 7.0.1d) requires the Pod Service, which in turn requires NSX-T integration.
As of 7.0.1d, the self-signed certificate created for this instance of Harbor is added to the trust for nodes in TKG clusters, making it easier (possible?) to use images from Harbor.
When you login to harbor as a user, you’ll notice that the menu is very sparse. Only the ‘admin’ account can access the “Administration” menu.
To get logged in as the ‘admin’ account, we’ll need to retrieve the password from a secret for the harbor controller in the Supervisor cluster.
Steps:
SSH into the vCenter Server as root, type ‘shell’ to get to bash shell
Type ‘/usr/lib/vmware-wcp/decryptK8Pwd.py‘ to return information about the Supervisor Cluster. The results include the IP for the cluster as well as the node root password
While still in the SSH session on the vCenter Server, ssh into the Supervisor Custer node by entering ‘ssh root@<IP address from above>’. For the password, enter the PWD value from above.
Now, we have a session as root on a supervisor cluster control plane node.
Enter ‘kubectl get ns‘ to see a list of namespaces in the supervisor cluster. You’ll see a number of hidden, system namespaces in addition to those corresponding to the vSphere namespaces. Notice there is a namespace named “vmware-system-registry” in addition to one named “vmware-system-registry-#######”. The namespace with the number is where Harbor is installed.
Run ‘kubectl get secret -n vmware-system-registry-######‘ to get a list of secrets in the namespace. Locate the secret named “harbor-######-controller-registry”.
Run this to return the decoded admin password: kubectl get secret -n vmware-system-registry-###### harbor-######-controller.data.harborAdminPassword}' | base64 -d | base64 -d
In the cases I seen so far, the password is about 16 characters long, if it’s longer than that, you may not have decoded it entirely. Note that the value must be decoded twice.
Once you’ve saved the password, enter “exit” three times to get out of the ssh sessions.
Notes
Don’t manipulate the authentication settings
The process above is not supported; VMware GSS will not help you complete these steps
Some features may remain disabled (vulnerability scanning for example)
As admin, you may configure registries and replication (although it’s probably unsupported with this built-in version of Harbor for now)
So, lets say you want to deploy an instance of Harbor to your “services” kubernetes cluster. The cluster is protected by a scheduled Velero backup Velero pickup all resources in all namespaces by default, but we need to add an annotation to indicate a persistent volume that should be included in the backup. Without this annotation, Velero will not include the PV in the backup.
First, let’s create a namespace we want to install Harbor to: kubectl create ns harbor Then, we’ll make sure helm has the chart for Harbor helm repo add harbor https://helm.goharbor.io
helm repo update Finally, we’ll install harbor helm install harbor harbor/harbor --namespace harbor \
--set expose.type=loadBalancer,expose.tls.enabled=true,expose.tls.commonName=harbor.ragazzilab.com,\
externalURL=harbor.ragazzilab.com,harborAdminPassword=harbor,\
redis.podAnnotations."backup\.velero\.io/backup-volumes"=data,\
registry.podAnnotations."backup\.velero\.io/backup-volumes"=registry-data,\
trivy.podAnnotations."backup\.velero\.io/backup-volumes"=data,\
database.podAnnotations."backup\.velero\.io/backup-volumes"=database-data,\
chartmuseum.podAnnotations."backup\.velero\.io/backup-volumes"=chartmuseum-data,\
jobservice.podAnnotations."backup\.velero\.io/backup-volumes"=job-logs
Notice a few of the configurations we’re passing here:
expose.tls.commonName is the value that will be used by the gnerated TLS certificate
externalURL is the FQDN that we’ll use to reach Harbor (post deploy, you’ll get the loadBalancer IP and add the DNS record for it)
harborAdminPassword is the password assigned by default to the admin account – clearly this should be changed immediately
The next items are for the podAnnotations; the syntax was unexpectedly different. Notice there’s a dot instead of an equals-sign between the key and the value. Also notice that the dots in the value must be escaped.
Once Harbor is deployed, you can get the loadBalancer’s IP and point your browser at it.
Now, we can wait for the Velero backup job to run or kick off a one-off backup.
I noticed that Harbor did not start properly after restore. This was because postgres in the database pod expects a specific set of permissions – which were apparently different as a result of the restore. The log on the database pod only read FATAL: data directory “/var/lib/postgresql/data” has group or world access
To return Harbor to functionality post-restore, I had to take the following steps:
Edit the database statefulSet: kubectl edit StatefulSet harbor-harbor-database -n harbor
Replace the command in the “change-permission-of-directory” initContainer from chown -R 999:999 /var/lib/postgresql/data to chmod -R 0700 /var/lib/postgresql/data
Save changes and bounce the database pod by running kubectl delete po -n harbor harbor-harbor-database-0
Bounce the remaining pods that are in CrashLoopBackup (because they’re trying to connect to the database)
Thanks to my friend and colleague Hemanth AVS for help with the podAnnotations syntax!
Tanzu Kubernetes Grid includes and supports packages for dex and Gangway. These are used to extend authentication to LDAP and OIDC endpoints. Recall that Kubernetes does not do user-management or traditional authentication. As a K8s cluster admin, you can create service accounts of course, but those are not meant to be used by developers.
Think of dex as a transition layer, it uses ‘connectors’ for upstream Identity providers (IdP) like Active Directory for LDAP or Okta for SAML and presents an OpenID Connect (OIDC) endpoint for k8s to use.
TKG provides not only the packages mentioned above, but also a collection of yaml files and documentation for implementation. The current version (as of May 12, 2020) documentation for configuring authentication is pretty general, the default values in the config files are suitable for OpenLDAP. So, I thought I’d share the specific settings for connecting dex to Active Directory.
Assumptions:
TKG Management cluster is deployed
Following the VMware documentation
Using the TKG-provided tkg-extensions
dex will be deployed to management cluster or to a specific workload cluster
Edits to authentication/dex/vsphere/ldap/03-cm.yaml – from Docs
Replace <MGMT_CLUSTER_IP> with the IP address of one of the control plane nodes of your management cluster. This is one of the control plane nodes where we’re putting dex
If the LDAP server is listening on the default port 636, which is the secured configuration, replace <LDAP_HOST> with the IP or DNS address of your LDAP server. If the LDAP server is listening on any other port, replace <LDAP_HOST> with the address and port of the LDAP server, for example 192.168.10.22:389 or ldap.mydomain.com:389. Never, never, never use unencrypted LDAP. You’ll need to specify port 636 unless your targeted AD controller is also a Global Catalog server in which case you’ll specify port 3269. Check with the AD team if you’re unsure.
If your LDAP server is configured to listen on an unsecured connection, uncomment insecureNoSSL: true. Note that such connections are not recommended as they send credentials in plain text over the network. Never, never, never use unencrypted LDAP.
Update the userSearch and groupSearch parameters with your LDAP server configuration. This need much more detail – see steps below
Edits to authentication/dex/vsphere/ldap/03-cm.yaml – AD specific
Obtain the root CA public certificate for your AD controller. Save a base64-encoded version of the certificate: echo root64.cer | base64 > rootcer.b64 for example will write the data from the PEM-encoded root64.cer file into a base64-encoded file named rootcer.b64
Add the base64-encoded certificate content to the rootCAData key. Be sure to remove the leading “#”. This is an alternative to using the rootCA key, where we’ll have to place the file on each Control Plane node
Update the userSearch values as follows:
key
default
set to
notes
baseDN
ou=people,
dc=vmware,dc=com
DN of OU in AD under
which user accounts are found
Example: ou=User Accounts,DC=ragazzilab,DC=com
filter
“(objectClass=
posixAccount)”
“(objectClass=person)”
username
uid
userPrincipalName
idAttr
uid
DN
Case-sensitive
emailAttr
mail
userPrincipalName
nameAttr
givenName
cn
Update the groupSearch values as follows:
key
default
set to
notes
baseDN
ou=people,
dc=vmware,dc=com
DN of OU in AD under
which security Groups are found
Example: DC=ragazzilab,DC=com
filter
“(objectClass=
posixGroup)”
“(objectClass=group)”
userAttr
uid
DN
Case-Sensitive
groupAttr
memberUid
“member:1.2.840.113556.1.4.1941:”
This is necessary to search within nested groups in AD
nameAttr
cn
cn
Other important Notes
When you create the oidc secret in the workload clusters running Gangway, the clientSecret value is base64-encoded, but the corresponding secret for the workload cluster in the staticClients section of the dex configmMap is decoded. This can be confusing since the decoded value is also randomly-generated.
Login to Harbor Web GUI as an administrator. Navigate to Administration/Registries
Add Endpoint for local Harbor by clicking ‘New Endpoint’ and entering the following:
Provider: harbor
Name: local (or FQDN or whatever)
Description: optional
Endpoint URL: the actual URL for your harbor instance beginning with https and ending with :443
Access ID: username for an admin or user that at least has Project Admin permission to the target Projects/namespaces
Access Secret: Password for the account above
Verify Remote Cert: typically checked
Add Endpoint for Docker Hub by clicking ‘New Endpoint’ and entering the following:
Provider: docker-hub
Name: dockerhub (or something equally profound)
Description: optional
Endpoint URL: pre-populated/li>
Access ID: username for your account at dockerhub
Access Secret: Password for the account above
Verify Remote Cert: typically checked
Notice that this is for general dockerhub, not targeting a particular repo.
Configure Replications for the Yelb Images
You may create replications for several images at once using a variety of filters, but I’m going to create a replication rule for each image we need. I think this makes it easier to identify a problem, removes the risk of replicating too much and makes administration easier. Click ‘New Replication Rule‘ enter the following to create our first rule:
Name: yelb-db-0.5
Description: optional
Replication Mode: Pull-based (because we’re pulling the image from DockerHub)
Source registry: dockerhub
Source Registry Filter – Name: mreferre/yelb-db
Source Registry Filter – Tag: 0.5
Source Registry Filter – Resource: pre-populated
Destination Namespace: yelb (or whatever Project you want the images saved to)
Trigger Mode: Select ‘Manual’ for a one-time sync or select ‘Scheduled’ if you want to ensure the image is replicated periodically. Note that the schedule format is cron with seconds, so 0 0 23 * * 5 would trigger the replication to run every Friday at 23:00:00. Scheduled replication makes sense when the tag filter is ‘latest’ for example
Override: leave checked to overwrite the image if it already exists
Enable rule: leave checked to keep the rule enabled
Add the remaining Replication Rules:
Name
Name Filter
Tag Filter
Dest Namespace
yelb-ui-latest
mreferre/yelb-ui
latest
yelb
yelb-appserver-latest
mreferre/yelb-appserver
latest
yelb
redis-4.0.2
library/redis
4.0.2
yelb
Note that redis is an official image, so we have to include library/
Pivotal Container Service (PKS) 1.5 and Kubernetes 1.14 bring *beta* support for Workers running Windows. This means that we can provide the advantages of Kubernetes to a huge array of applications running on Windows. I see this especially useful for Windows applications that you don’t have the source code for and/or do not want to invest in reworking it for .NET core or languages that run on Linux.
In nearly all cases, you’ll need an image with your applications’ dependencies or configuration and in the real world, we don’t want those in the public space like dockerhub. Enter Private Docker Repositories.
PKS Enterprise includes VMware Harbor as a private registry, it’s very easy to deploy alongside PKS and provides a lot of important functionality. The Harbor interface uses TLS/SSL; you may use a self-signed, enterprise PKI-signed or public CA-signed certificate. If you chose to not use a public CA-signed certificate ($!), the self-signed or PKI-signed certificate must be trusted by the docker engine on each Kubernetes worker node.
Clusters based on Ubuntu Xenial Stemcells:
The operator/administrator simply puts the CA certificate into the “Trusted Certificates” box of the Security section in Ops Manager.
When BOSH creates the VMs for kubernetes clusters, the trusted certificates are added to the certificate store automatically.
If using an enterprise PKI where all of the internal certificates are signed by the Enterprise CA, this method makes it very easy to trust and “un-trust” CAs.
Clusters based on Windows 2019 Stemcells:
This is one of those tasks that is easier to perform on Linux that it is on Windows. Unfortunately, Windows does not automatically add the Trusted Certificates from Ops Manager to the certificate store, so extra steps are required.
Obtain the Registry CA Certificate. In Harbor, you may click the “REGISTRY CERTIFICATE” link while in a Project. Save the certificate to where the BOSH cli is installed (Ops Manager typically).
List BOSH-managed vms to identify the service_instance deployment corresponding to the targeted K8s cluster by matching the VM IP address to the IP address of the master node as reported by PKS cluster.
Run this command to copy the certificate to the Windows worker
bosh -e ENV -d DEPLOYMENT scp root.cer WINDOWS-WORKER:/
ENV – your environment alias in the BOSH cli
DEPLOYMENT – the BOSH deployment that corresponds to the k8s cluster; ex: service-instance_921bd35d-c46d-4e7a-a289-b577ff743e15
WINDOWS-WORKER – the instance name of the specific Windows worker VM; ex: windows-worker/277536dd-a7e6-446b-acf7-97770be18144
This command copies the local file named root.cer to the root folder on the Windows VM
Use BOSH to SSH into the Windows Worker.
bosh -e ENV -d DEPLOYMENT ssh WINDOWS-WORKER
ENV – your environment alias in the BOSH cli
DEPLOYMENT – the BOSH deployment that corresponds to the k8s cluster; ex: service-instance_921bd35d-c46d-4e7a-a289-b577ff743e15
WINDOWS-WORKER – the instance name of the specific Windows worker VM; ex: windows-worker/277536dd-a7e6-446b-acf7-97770be18144
SSH into Windows node, notice root.cer on the filesystem
In the Windows SSH session run “powershell.exe” to enter powershell
The example above imports the local file “root.cer” into the Trusted Root Certificate Store
Type “exit” twice to exit PS and SSH
Repeat steps 5-8 for each worker node.
Add docker-registry secret to k8s cluster
Whether the k8s cluster is running Windows workers or not, you’ll want to add credentials for authenticating to harbor. These credentials are stored in a secret. To add the secret, use this command:
HARBOR_FQDN – FQDN for local/private Harbor registry
HARBOR_USER – name of user in Harbor with access to project and repos containing the desired images
USER_PASS – username for the above account
USER_EMAIL – email adddress for the above account
Note that this secret is namespaced; it needs to be added to the namespace of the deployments that will reference it
More info
Here’s an example deployment yaml for a Windows K8s cluster that uses a local private docker registry. Note that Windows clusters cannot leverage NSX-T yet, so this example uses a NodePort to expose the service.
I confess, most of my experience with Kubernetes is with Pivotal Container Service (PKS) Enterprise. PKS makes it rather easy to get started and I found that I took some tasks for granted.
In PKS Enterprise, one can use the pks cli to not only life-cycle clusters, but to obtain the credentials to the cluster and automatically update the kubeconfig with the account information. So, administrative/operations users can run the command “pks get-credentials my-cluster” to have a kubeconfig updated with the authentication tokens and parameters to connect to my-cluster.
K8s OIDC using UAA on PKS
The PKS controller includes the User Account and Authentication (UAA) component, which is used to authenticate users into PKS Enterprise. UAA can also be easily configured to connect to an existing LDAP service – this is the desired configuration in most organizations so that users account exist in one place (Active Directory in my example).
So, I found myself wondering “I don’t want to provide the PKS CLI to developers, so how can they connect kubectl to the cluster?”
Assumptions:
PKS Enterprise on vSphere (with or without NSX-T)
Active Directory
Developer user account belongs to the k8s-devs security group in AD
Prerequisite configuration:
UAA on PKS configured a with UAA User Account Store: LDAP Server. This links UAA to LDAP/Active Directory
User Search Filter: userPrincipalName={0} This means that users can login as user@domain.tld
Group Search Filter: member={0} This ensures that AD groups may be used rather than specifying individual users
Configure created clusters to use UAA as the OIDC provider: Enabled This pre-configures the kubernetes API to use OpenID Connect with UAA. If not using PKS Enterprise, you’ll need to provide another OpenID Connect-Compliant endpoint (like Dex), link it to Active Directory and update the kubernetes cluster api manually to use the OpenID Authentication.
Operator: Create Role and RoleBinding:
While authentication is handled by OIDC/UAA/LDAP, Authorization must be configured on the cluster to provide access to resources via RBAC. This is done by defining a Role (or clusterRole) that indicates what actions may be taken on what resources and a RoleBinding which links the Role to one or more “subjects”.
Authenticate to kubernetes cluster with an administrative account (for example, using PKS cli to connect)
Create yaml file for our Role and RoleBinding:
kind: Role
apiVersion: rbac.authorization.k8s.io/v1
metadata:
  name: developers
rules:
- apiGroups: ["", "extensions", "apps"]
  resources: ["deployments", "replicasets", "pods"]
  verbs: ["get", "list", "watch", "create", "update", "patch", "delete"]
  # You can also use ["*"]
---
kind: RoleBinding
apiVersion: rbac.authorization.k8s.io/v1beta1
metadata:
  name: developer-dev-binding
subjects:
- kind: Group
  name: k8s-devs
  apiGroup: rbac.authorization.k8s.io
roleRef:
  kind: Role
  name: developers
  apiGroup: rbac.authorization.k8s.io
In the example above, we’re creating a Role named “developers”, granting access to the core, extensions and apps API groups and several actions against deployments, replicaSets and pods. Notice that developers in this role would have have access to secrets (for example)
The example RoleBinding binds a group named “k8s-devs” to the developers role. Notice that we have not created the k8s-devs group in Kubernetes or UAA; it exists in Active Directory
Use Kubectl to apply the yaml, creating the Role and Rolebinding in the targeted namespace
Creating the kubeconfig – the hard way
To get our developer connected with kubectl, they’ll need a kubeconfig with the authentication and connection details. The Hard way steps are:
Operator obtains the cluster’s certificate authority data. This can be done via curl or by copying the value from the existing kubeconfig.
Operator creates a template kubeconfig, replacing the value specified, then sends it to the developer user
The developer user obtains the id_token and refresh_token from UAA, via a curl command curl 'https://PKS-API:8443/oauth/token' -k -XPOST -H
'Accept: application/json' -d "client_id=pks_cluster_client&client_secret=""&grant_type=password&username=UAA-USERNAME&response_type=id_token" --data-urlencode password=UAA-PASSWORD
The developer user updates the kubeconfig with the id_token and refresh token in the kubeconfig
Creating the kubeconfig – the easy way
Assuming the developer is using Mac or Linux…
Install jq on developer workstation
Download the get-pks-k8s-config.sh script, make it executable (chmod +x get-pks.k8s.config.sh)
Execute the script (replace the params with your own)


 Tanzu Kubernetes Grid includes and supports packages for dex and Gangway. These are used to extend authentication to LDAP and OIDC endpoints. Recall that Kubernetes does not do user-management or traditional authentication. As a K8s cluster admin, you can create service accounts of course, but those are not meant to be used by developers.
 I found the documentation for actually replicating images from DockerHub to a local Harbor instance to be missing. So here’s what I’ve found:
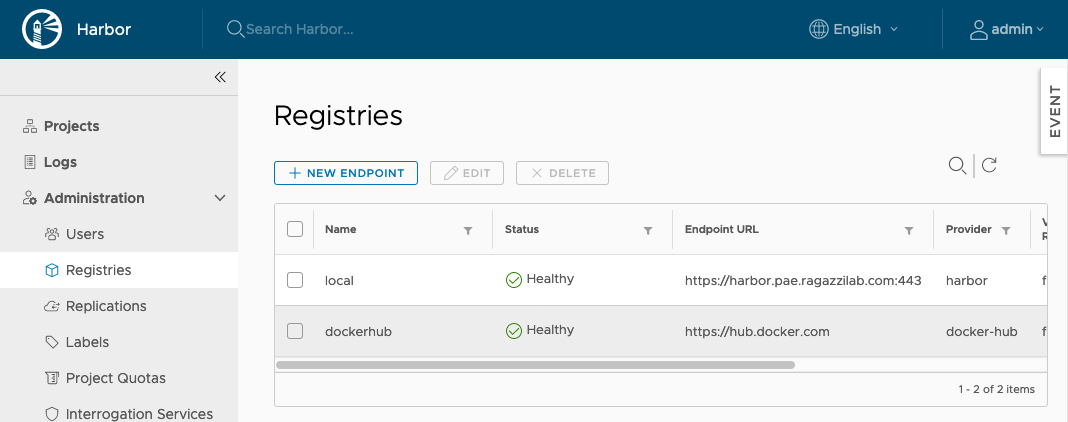
 Pivotal Container Service (PKS) 1.5 and Kubernetes 1.14 bring *beta* support for Workers running Windows. This means that we can provide the advantages of Kubernetes to a huge array of applications running on Windows. I see this especially useful for Windows applications that you don’t have the source code for and/or do not want to invest in reworking it for .NET core or languages that run on Linux.


